跨源资源共享(CORS)相关 headers
CORS 相关响应头
在进行 CORS 相关的配置时,通常需要一些以 Access-Control 开头的响应头,比如:
Access-Control-Allow-OriginAccess-Control-Allow-MethodsAccess-Control-Allow-HeadersAccess-Control-Allow-CredentialsAccess-Control-Expose-HeadersAccess-Control-Max-Age
要理解这些 header 的作用,可以直接动手通过一个简单的实验来辅助理解。
实验代码的后端部分,基于 node + express。下面正式开始。
简单的 GET 跨域请求
首先,编写一个简单的接口服务,提供简单的路由,监听 127.0.0.1 的 3000 端口。代码如下:
const express = require('express')const app = express()
app.get('/test', (req, res) => { res.send('GET_TEST')})
app.listen(3000, () => { console.log(`Example app listening on port 3000`)})然后,我们使用浏览器,在 localhost 的其他端口,跨域运行请求代码,我们的例子运行在 http://localhost:8080(即 origin),请求代码如下:
fetch('http://127.0.0.1:3000/test') .then(res => res.text()) .then(console.log)代码执行后,观察 chrome 浏览器的网络面板,如下图,
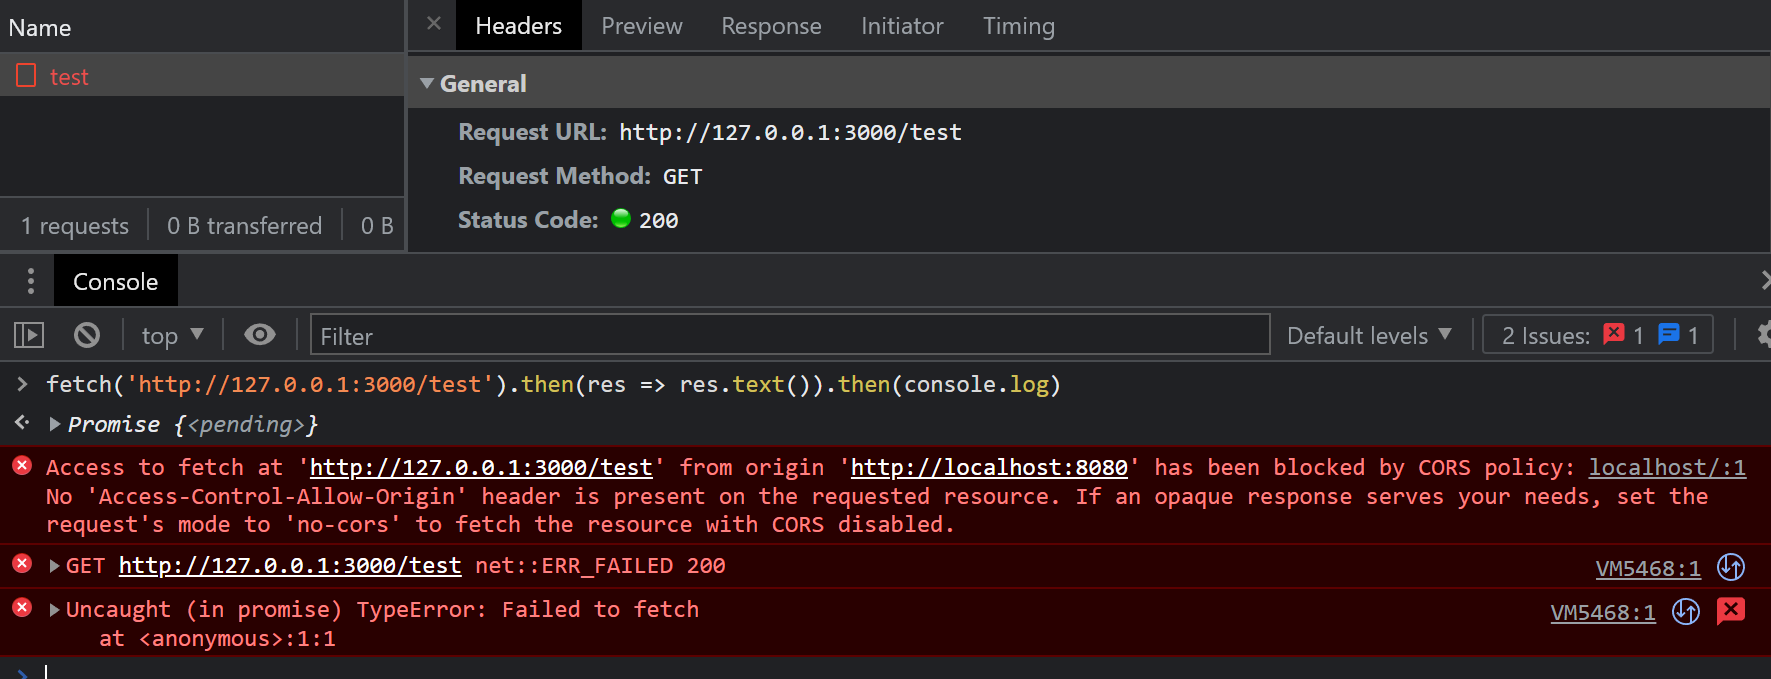
我们可以看到服务端响应 200 OK,但是控制台同时会报告一个 CORS error,并拒绝提供响应体给用户,错误内容如下:
Access to fetch at 'http://127.0.0.1:3000/test' from origin 'http://localhost:8080' has been blocked by CORS policy: No 'Access-Control-Allow-Origin' header is present on the requested resource. If an opaque response serves your needs, set the request's mode to 'no-cors' to fetch the resource with CORS disabled.从这个错误提示中,我们也可以知道,问题的关键在于 Access-Control-Allow-Origin 头。这个头信息用于指明允许的 Origin,其值可以是通配符 *。我们改造下服务端代码:
const express = require('express')const app = express()
// 新增该中间件代码app.use((req, res, next) => { res.header('Access-Control-Allow-Origin', '*') next()})
app.get('/test', (req, res) => { res.send('GET_TEST')})
app.listen(3000, () => { console.log(`Example app listening on port 3000`)})通过一个 Express 中间件,为每个响应都附加上 Access-Control-Allow-Origin 头,并将值设置为 *,再试试发送同样的请求,结果如图
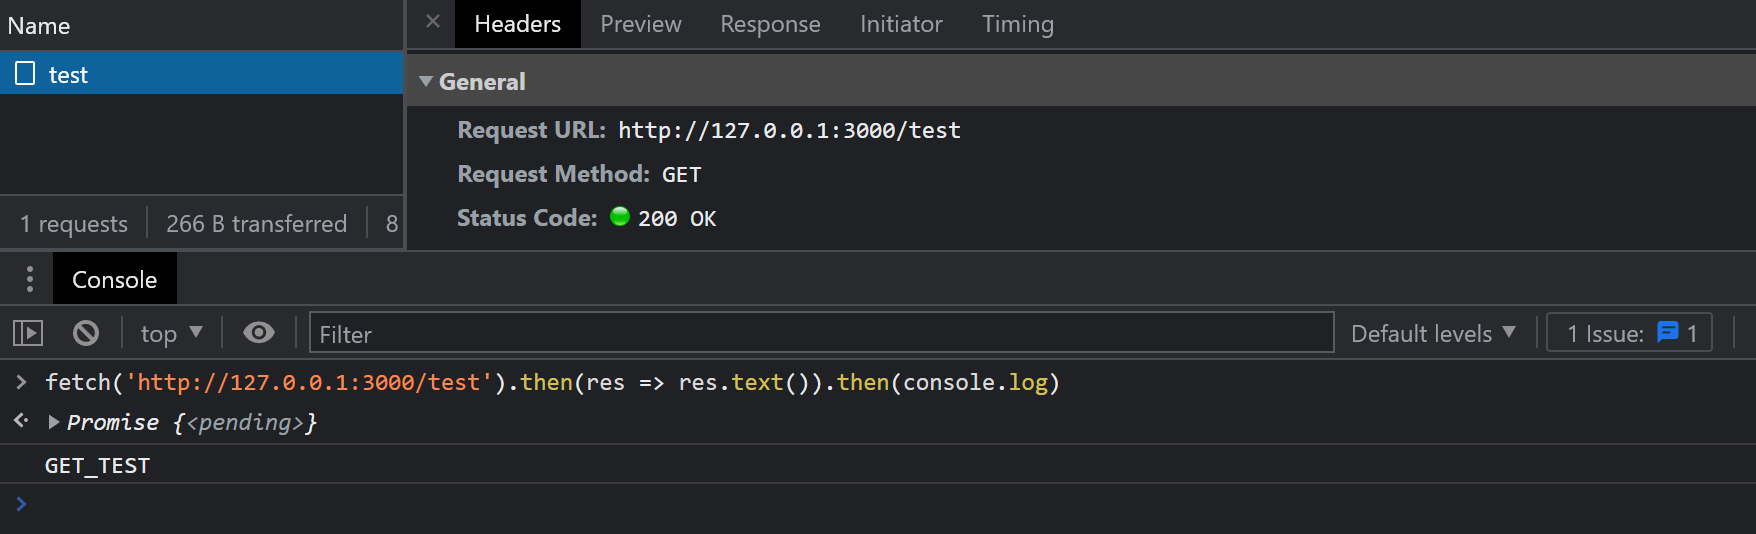
可以看到结果正确打印出:
GET_TEST更多跨域请求方法
以上最简单的情况通过了,那么对于 PUT、DELETE 等需要 通过 OPTIONS 请求进行预检(Preflight)的 HTTP 方法呢?
关于 Preflight request 请看文末参考资料
我们用 PUT 请求做一次测试,先改造服务端代码,加上一个新的路由:
app.put('/test', (req, res) => { res.send('PUT_TEST')})再从浏览器发送请求:
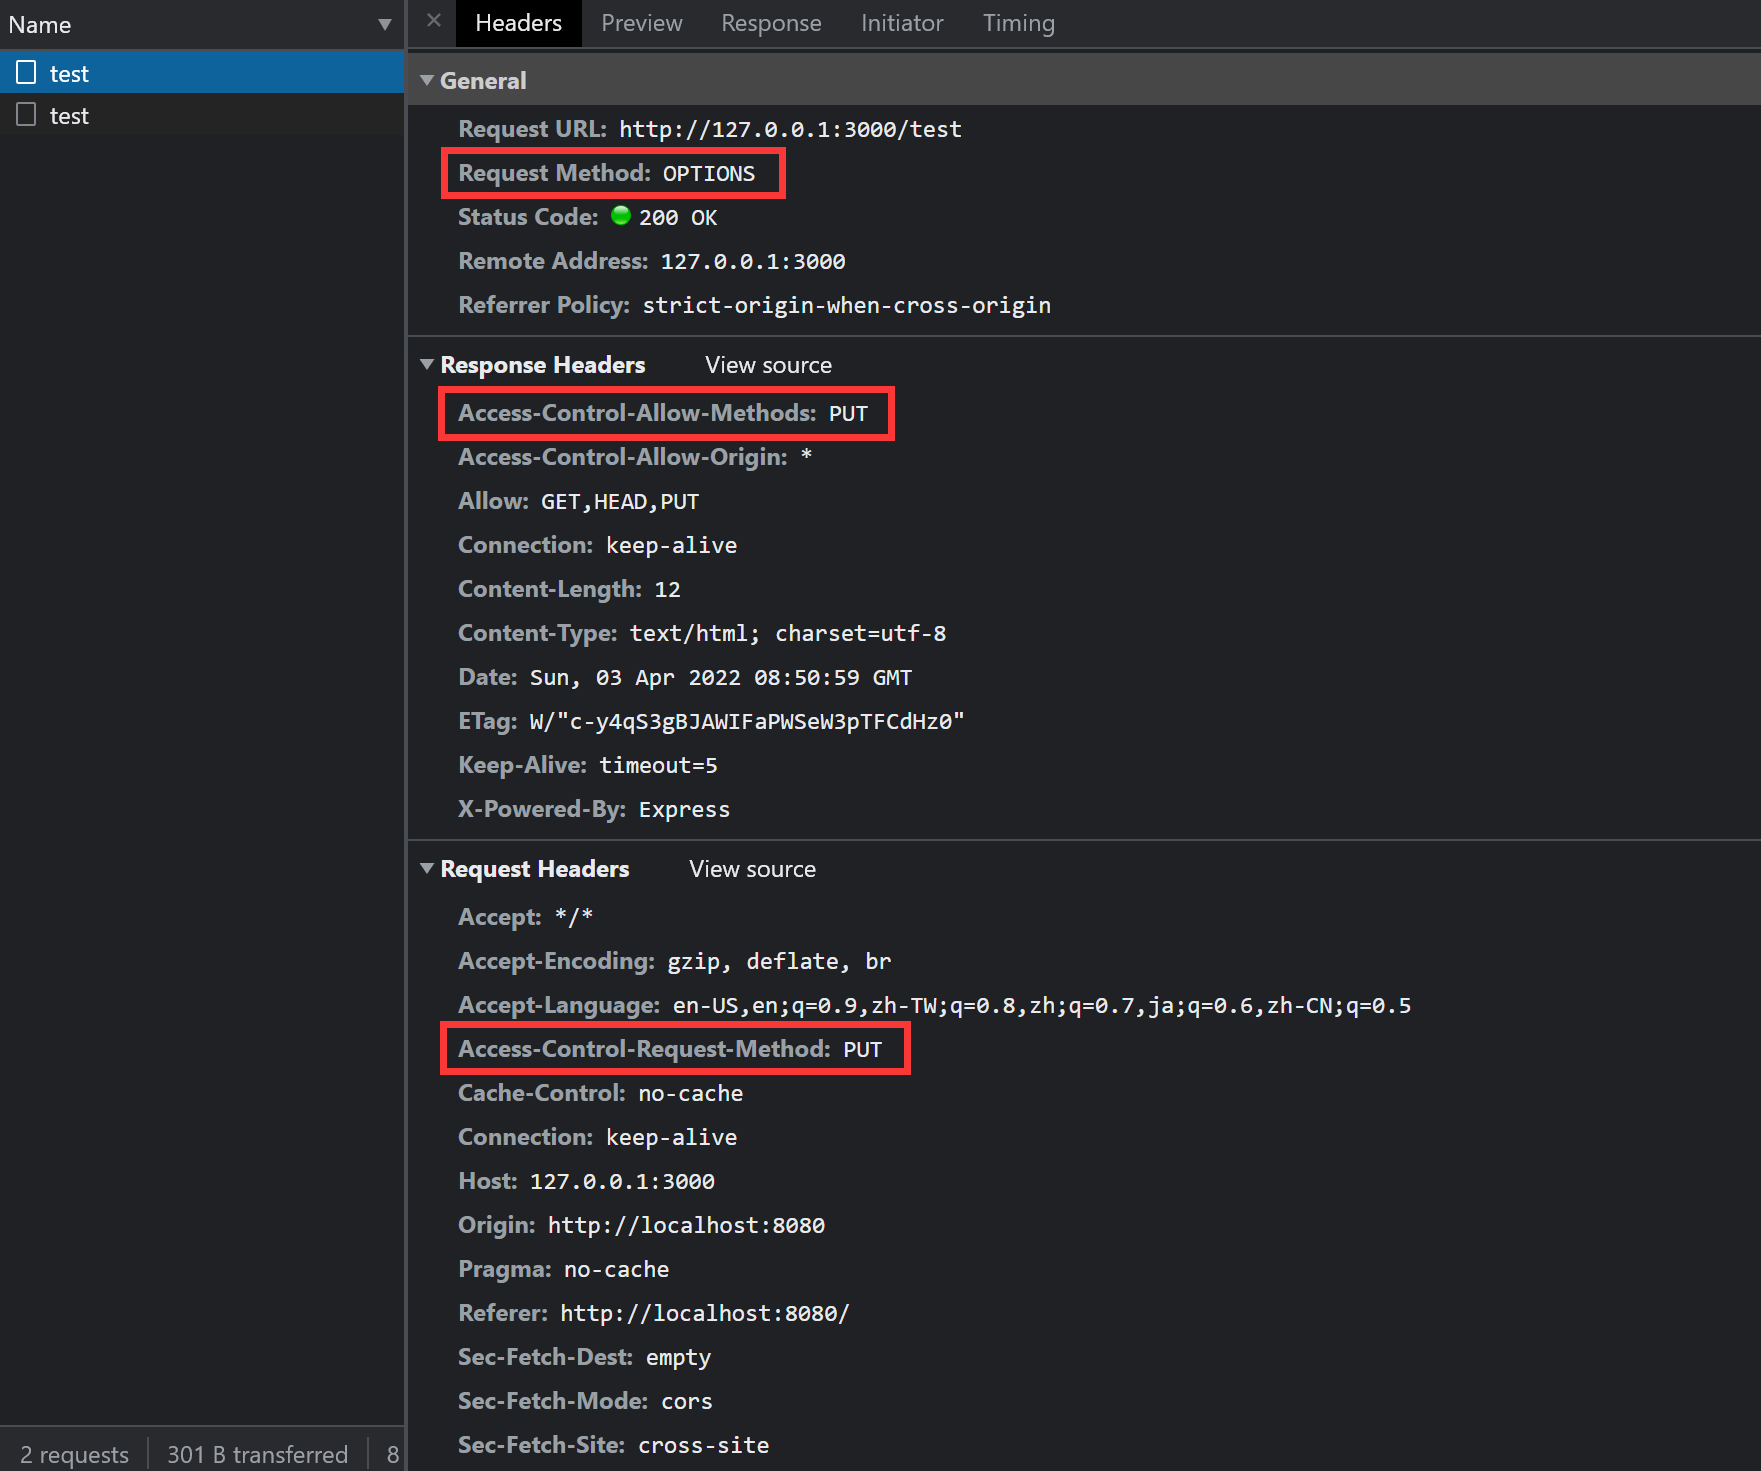
fetch('http://127.0.0.1:3000/test', { method: 'PUT' }) .then(res => res.text()) .then(console.log)网络面板中,可以观察到两个请求,其中一个是 OPTIONS 请求预检,一个失败的 PUT 请求:
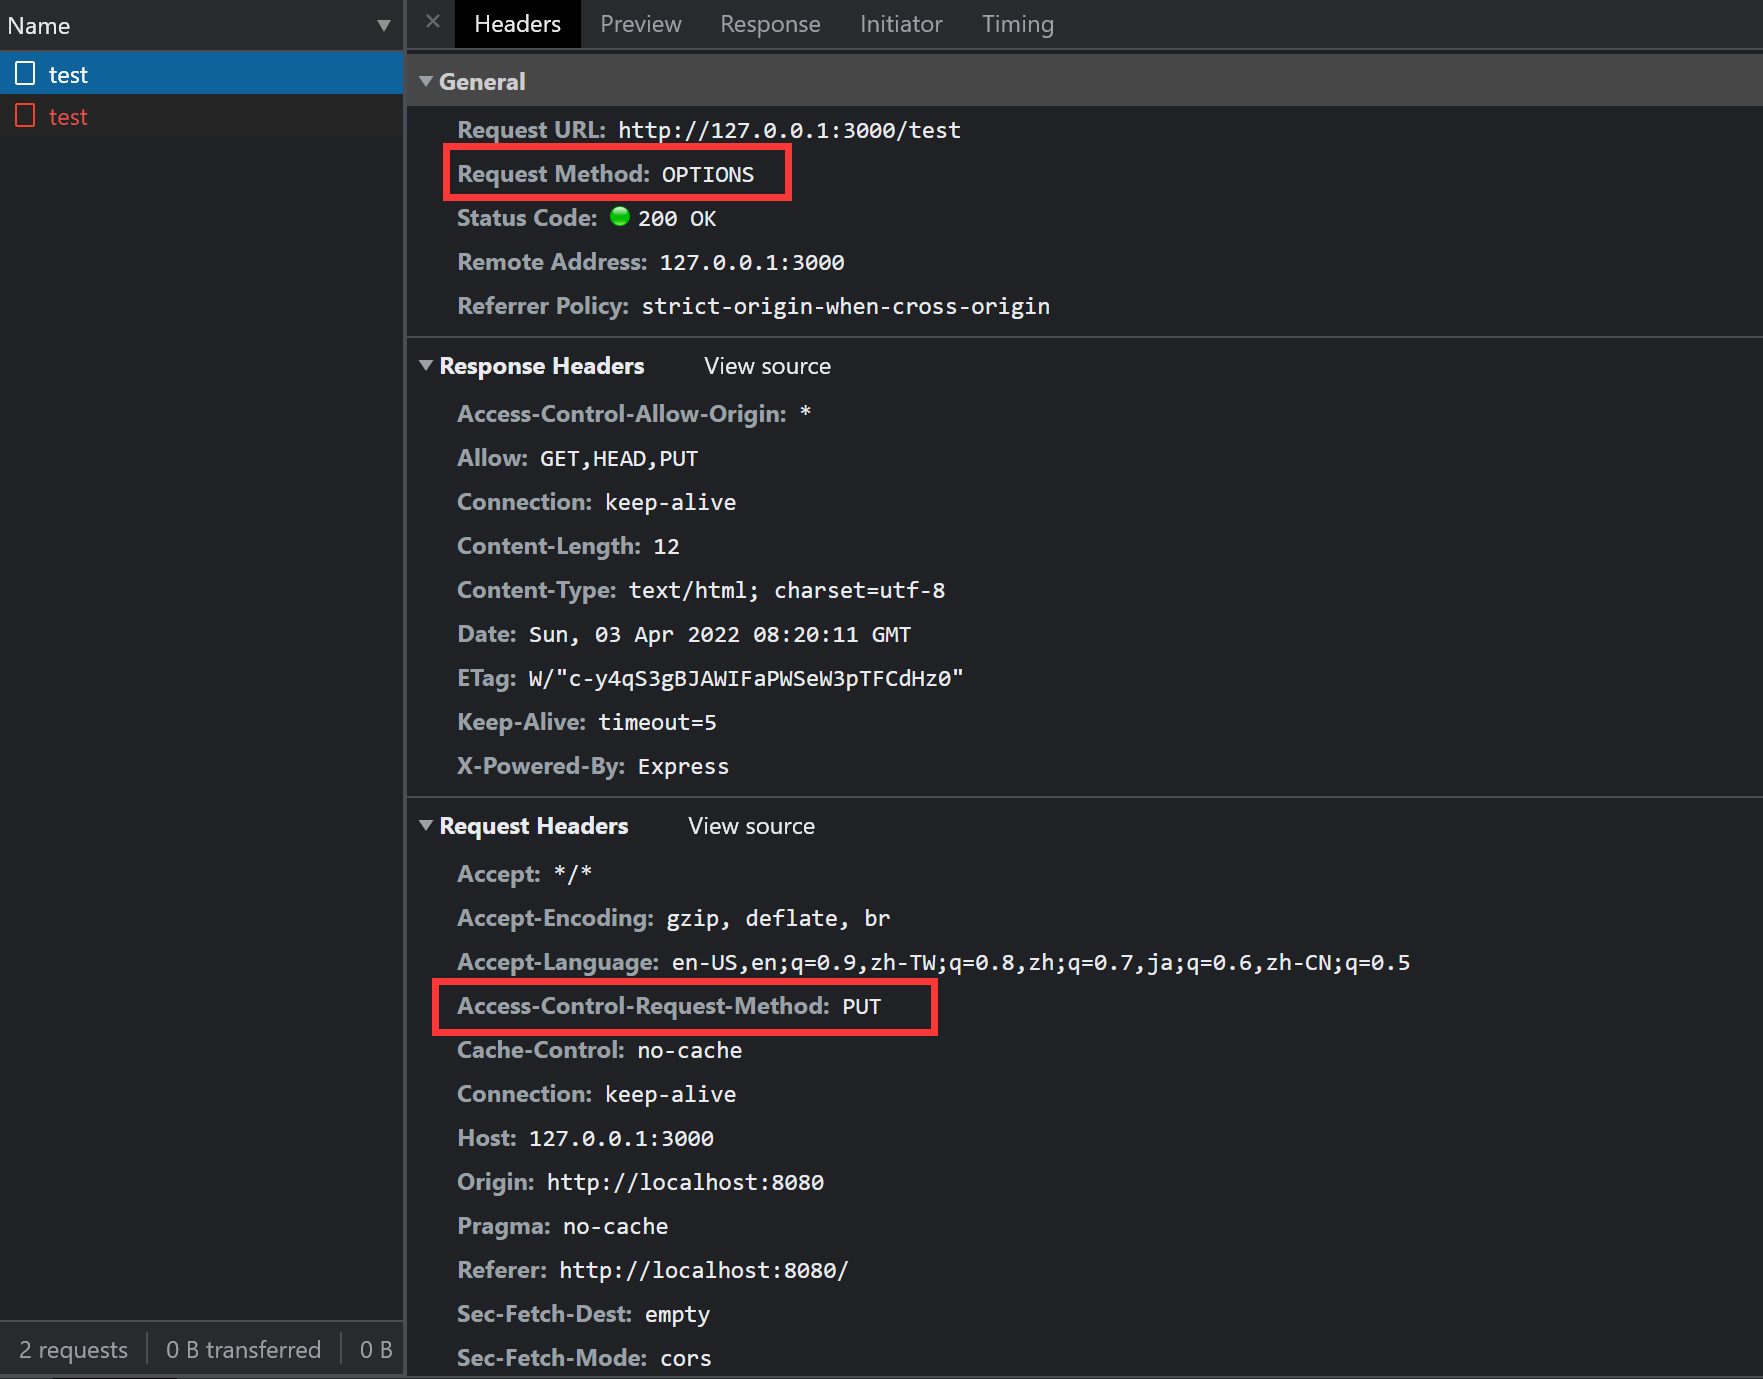
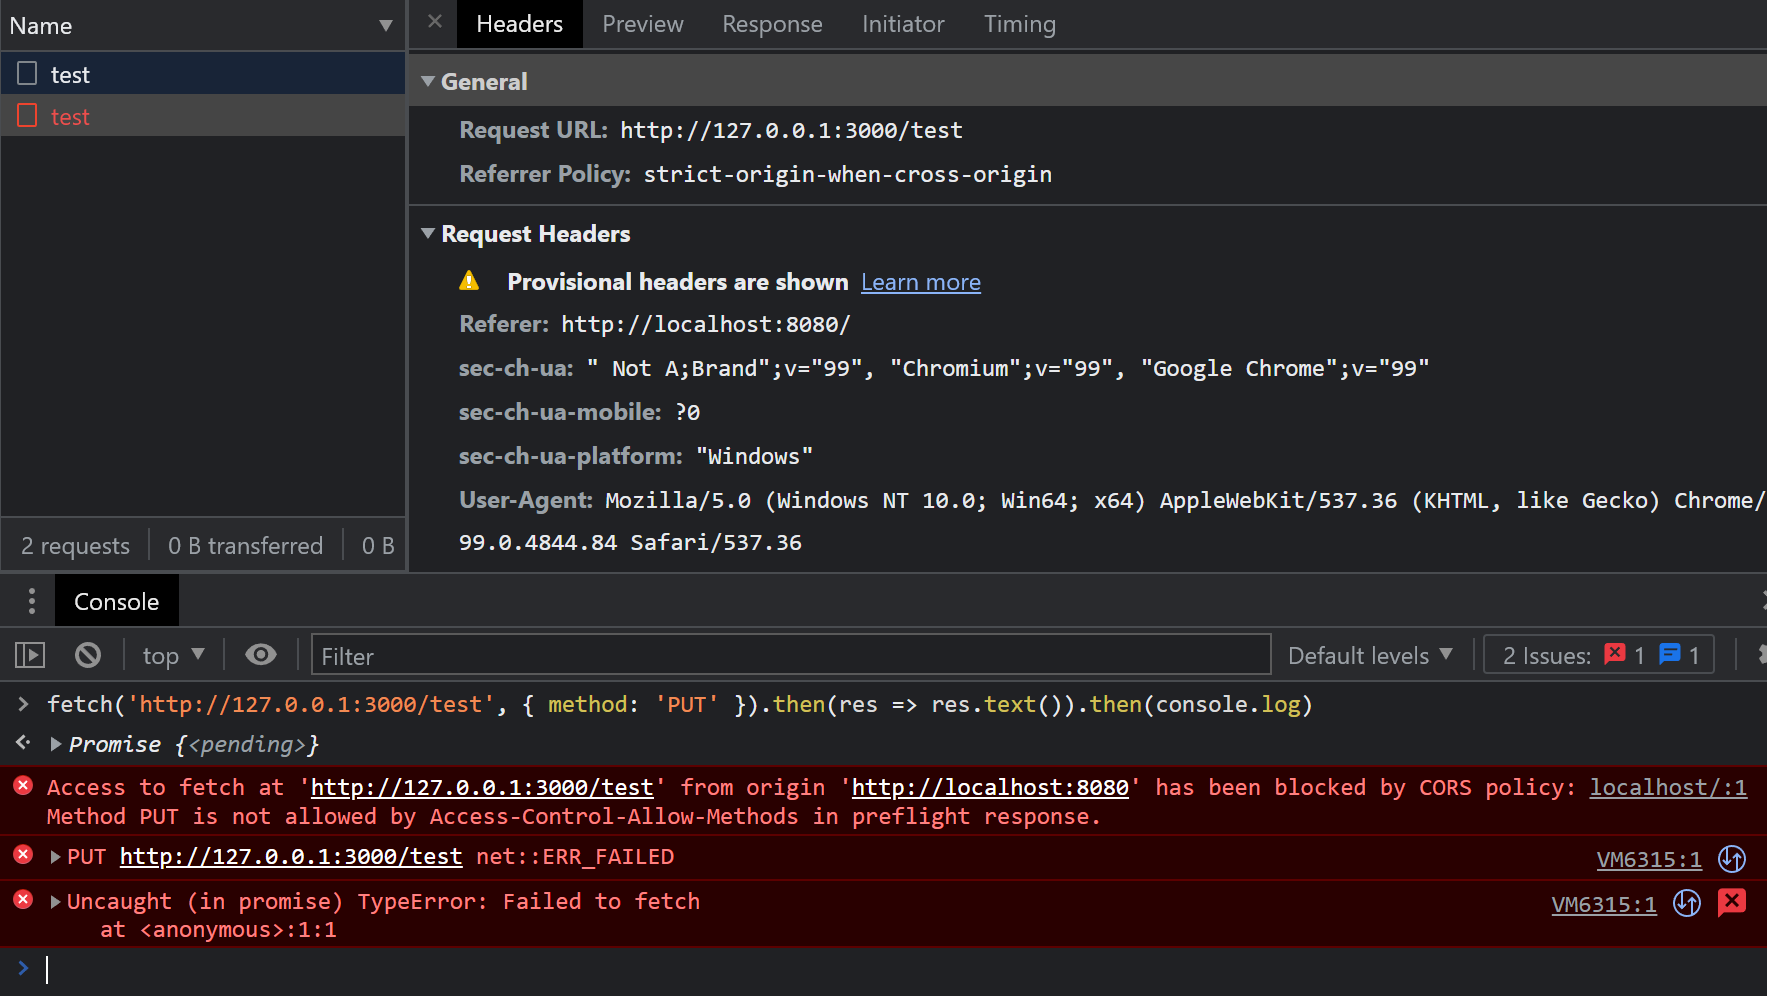
错误信息:
Access to fetch at 'http://127.0.0.1:3000/test' from origin 'http://localhost:8080' has been blocked by CORS policy: Method PUT is not allowed by Access-Control-Allow-Methods in preflight response.从错误信息中可以得知,预检的响应中,Access-Control-Allow-Methods 中没有对 PUT 的许可,因此被阻止了。
所以,我们改造下中间件,加上这个响应头,把 PUT 方法加上:
app.use((req, res, next) => { res.header('Access-Control-Allow-Origin', '*') res.header('Access-Control-Allow-Methods', 'PUT') next()})再次尝试发送请求,结果如下图:
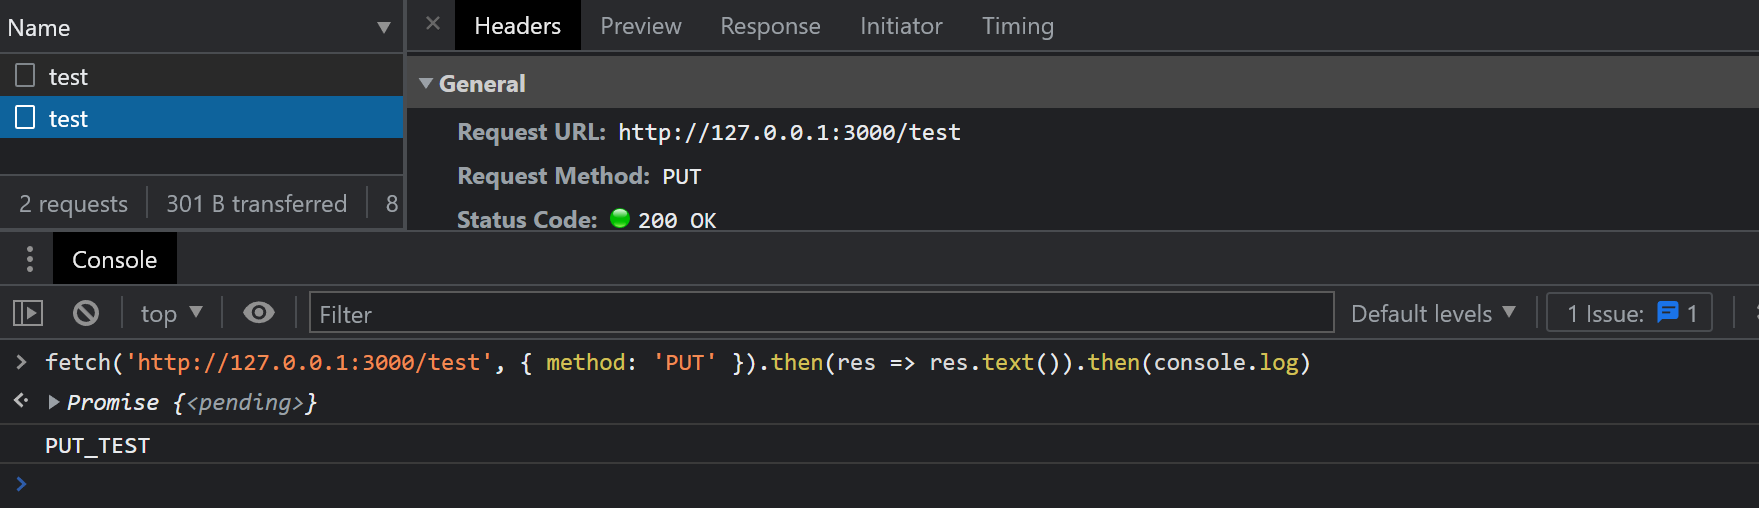
这回,就没有报错,可以成功获得结果了:
PUT_TEST至此,我们通过设置这两个响应头,就可以支持各种各样的 HTTP 方法了。
自定义 Headers
如果我们想更进一步,在请求的时候,通过附加一些自定义的请求头,用于给服务端传递额外信息,例如我们想传递一个 x-requested-with 头:
fetch('http://127.0.0.1:3000/test', { headers: { 'x-requested-with': 'XMLHttpRequest' }}) .then(res => res.text()) .then(console.log)此时的结果:
由于我们使用了自定义的请求头,所以需要发起预检检查服务端是否支持,观察错误消息:
Access to fetch at 'http://127.0.0.1:3000/test' from origin 'http://localhost:8080' has been blocked by CORS policy: Request header field x-requested-with is not allowed by Access-Control-Allow-Headers in preflight response.很显然,服务端并不支持该请求头,解决的方法,就是要附加上 Access-Control-Allow-Headers 响应头告诉客户端支持,继续改造我们的中间件:
app.use((req, res, next) => { res.header('Access-Control-Allow-Origin', '*'); res.header('Access-Control-Allow-Methods', 'PUT') res.header('Access-Control-Allow-Headers', 'x-requested-with') next()})再次发送请求,结果如下图:
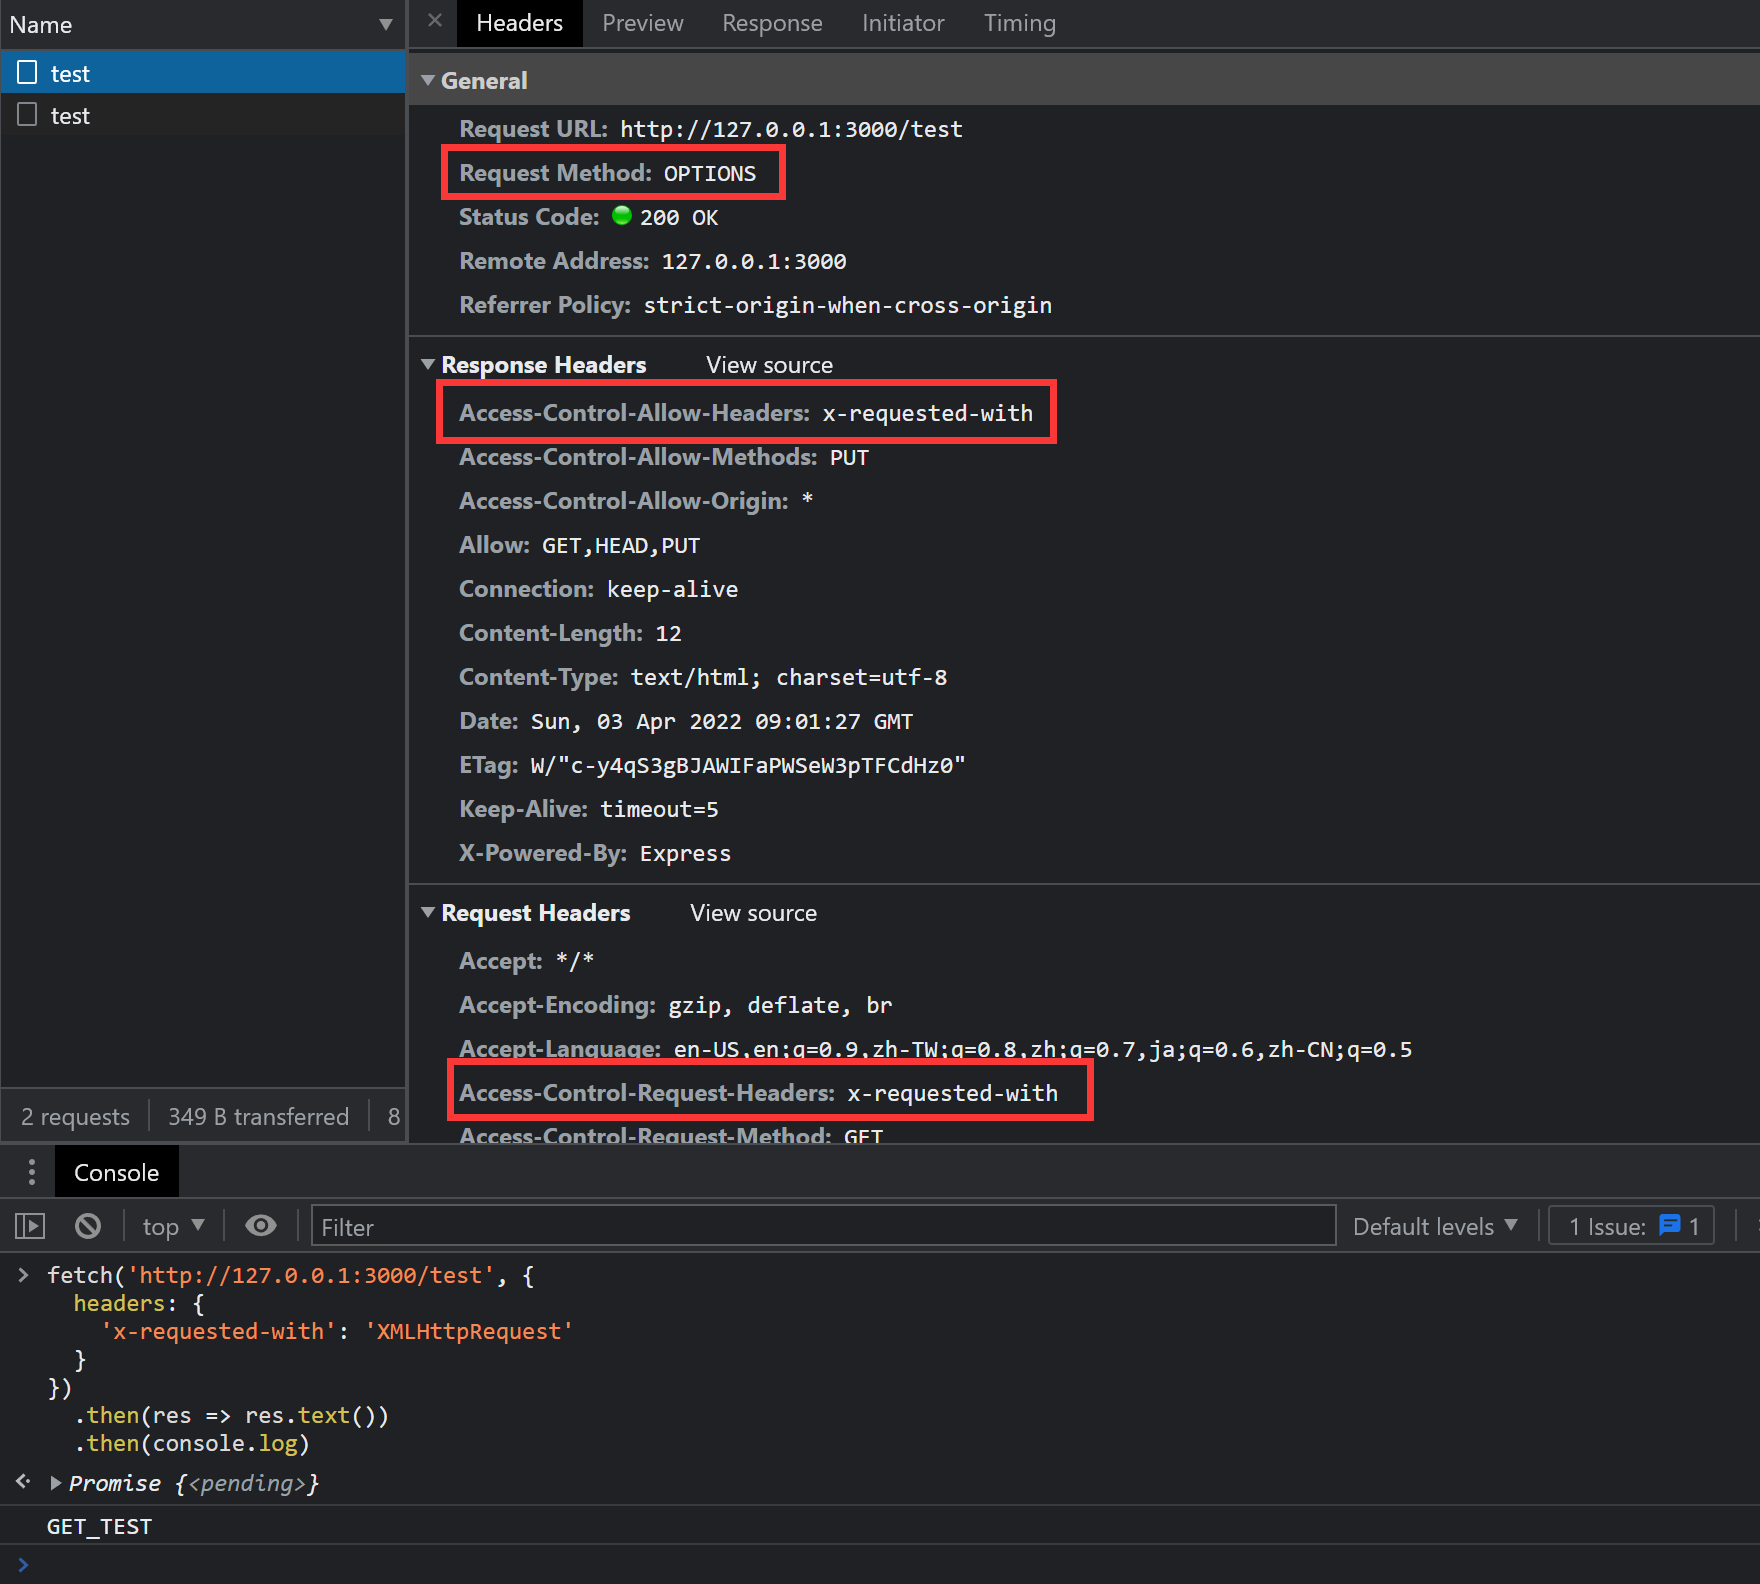
问题消除,再次正确打印信息。
既然发送特别的请求头给服务端,需要如此周折,那反过来,如果客户端也想读取一些服务端自定义的响应头呢?
继续测试,服务端代码我们加上一个路由:
app.get('/header', (req, res) => { res .header('test-header', 'test-header-value') .send('header')})再从浏览器发起请求看看:
fetch('http://127.0.0.1:3000/header') .then(res => { console.log(res.headers.get('test-header')) })结果如图:

打印出了 null,而网络面板的 Response Headers 里,也没有这个 test-header 头。
这时,就到了 Access-Control-Expose-Headers 出场了,需要暴露给用户的响应头,需要在这里指明,我们改造中间件:
app.use((req, res, next) => { res.header('Access-Control-Allow-Origin', '*'); res.header('Access-Control-Allow-Methods', 'PUT') res.header('Access-Control-Allow-Headers', 'x-requested-with') res.header('Access-Control-Expose-Headers', 'test-header') next()})再次测试,结果:
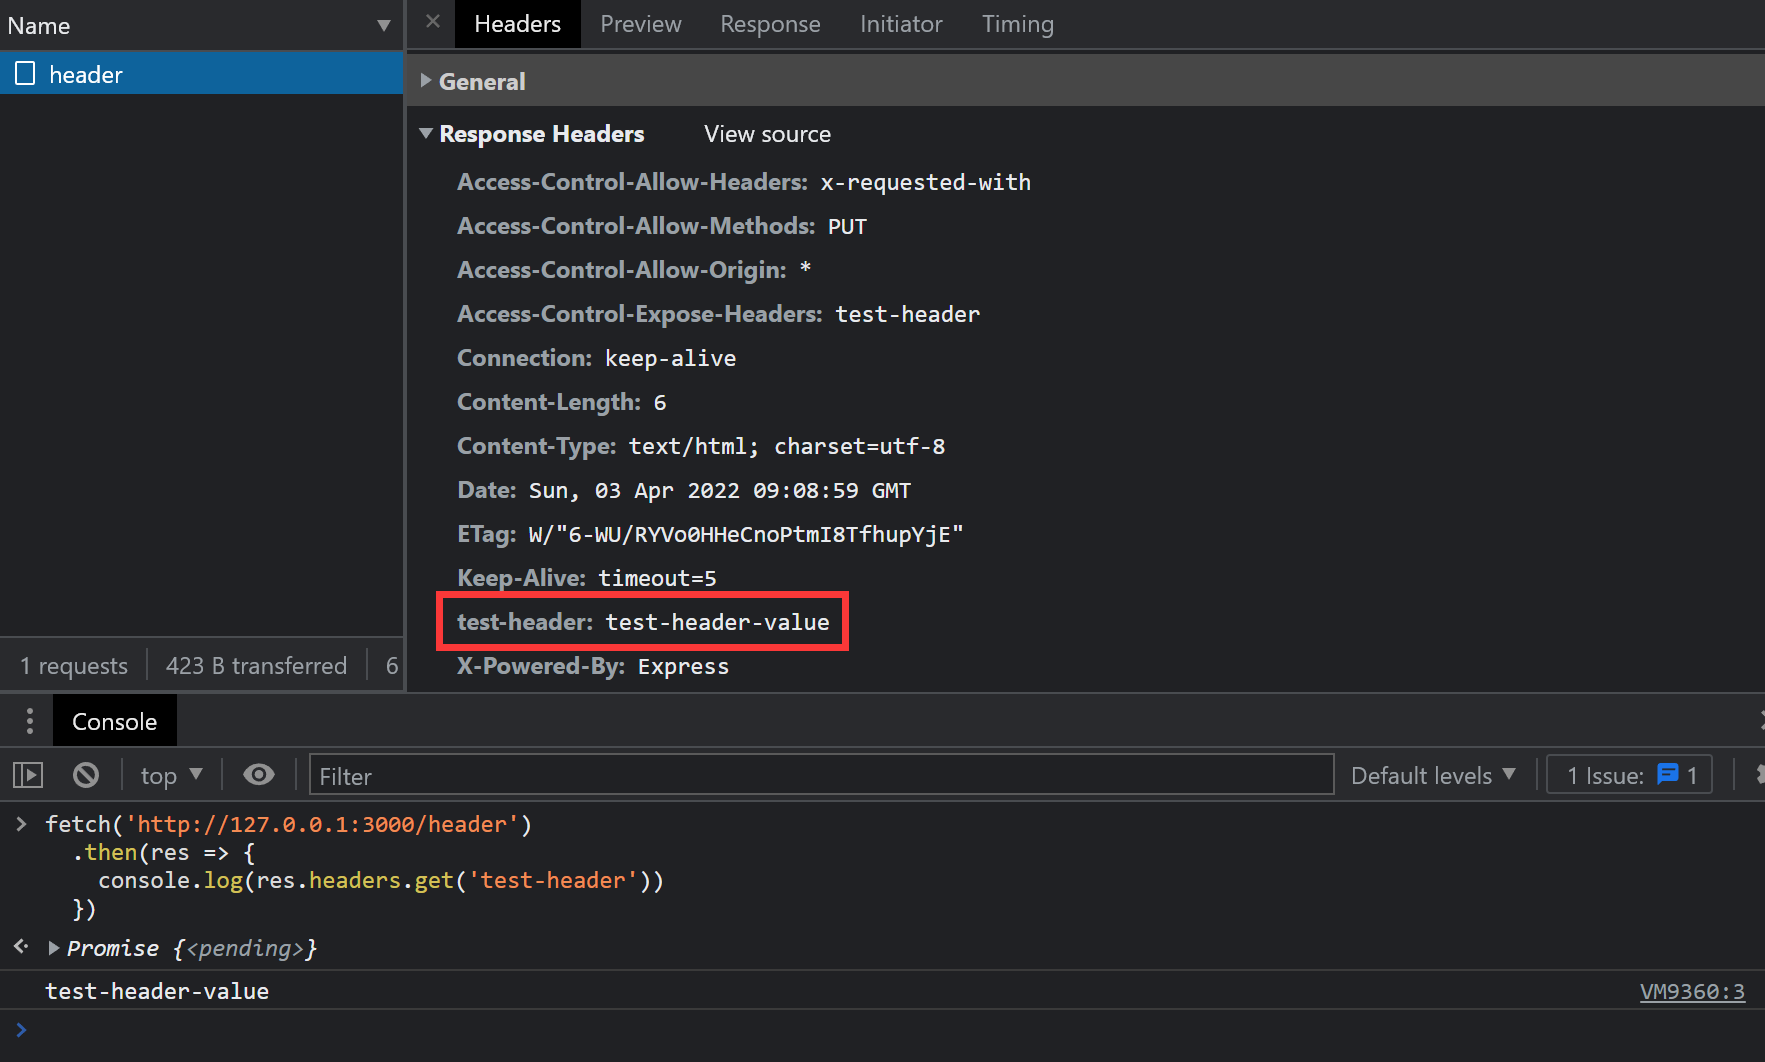
正确打印出 test-header-value,网络面板中也出现了该 header。
Credentials
假如我们又有了一个新的需求,需要在请求的时候,附加上 cookie 信息(或 authorization headers 或 TLS client certificates),这时候,就要将 credentials 模式改成 include。请求代码如下:
fetch('http://127.0.0.1:3000/test', { credentials: 'include'}) .then(res => res.text()) .then(console.log)注,如果用
XMLHttpRequest,则可以如下:
结果如下图:
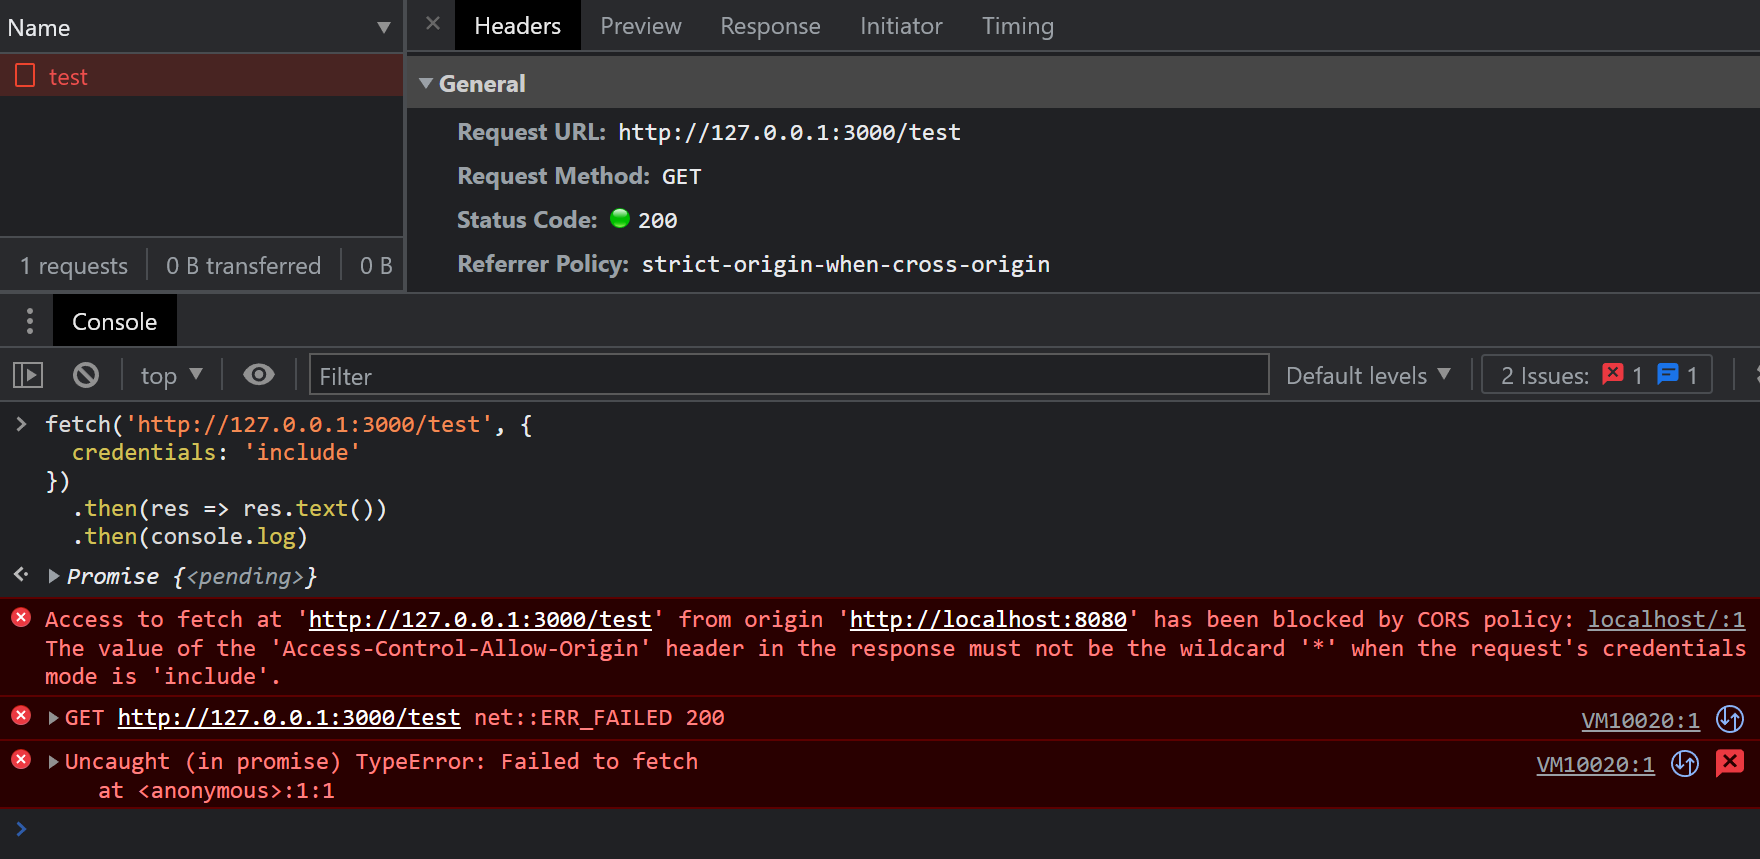
可以观察到新的错误:
Access to fetch at 'http://127.0.0.1:3000/test' from origin 'http://localhost:8080' has been blocked by CORS policy: The value of the 'Access-Control-Allow-Origin' header in the response must not be the wildcard '*' when the request's credentials mode is 'include'.从错误中,可以知道,在 credentials 模式为 include 的时候,之前设置的 Access-Control-Allow-Origin 头就不能简单粗暴的设为 * 了。
注,如果是 PUT 等方法,则再预检时,就能检测出该错误,然后阻止 PUT 请求。而 GET 这种简单请求,则是直接忽视返回的结果。
此时的解决方法就要明确设置 Access-Control-Allow-Origin 为跟请求的 Origin 对应的值,修改我们的中间件代码测试下:
app.use((req, res, next) => { res.header('Access-Control-Allow-Origin', 'http://localhost:8080') res.header('Access-Control-Allow-Methods', 'PUT') res.header('Access-Control-Allow-Headers', 'x-requested-with') res.header('Access-Control-Expose-Headers', 'test-header') next()})再次请求,结果如下:
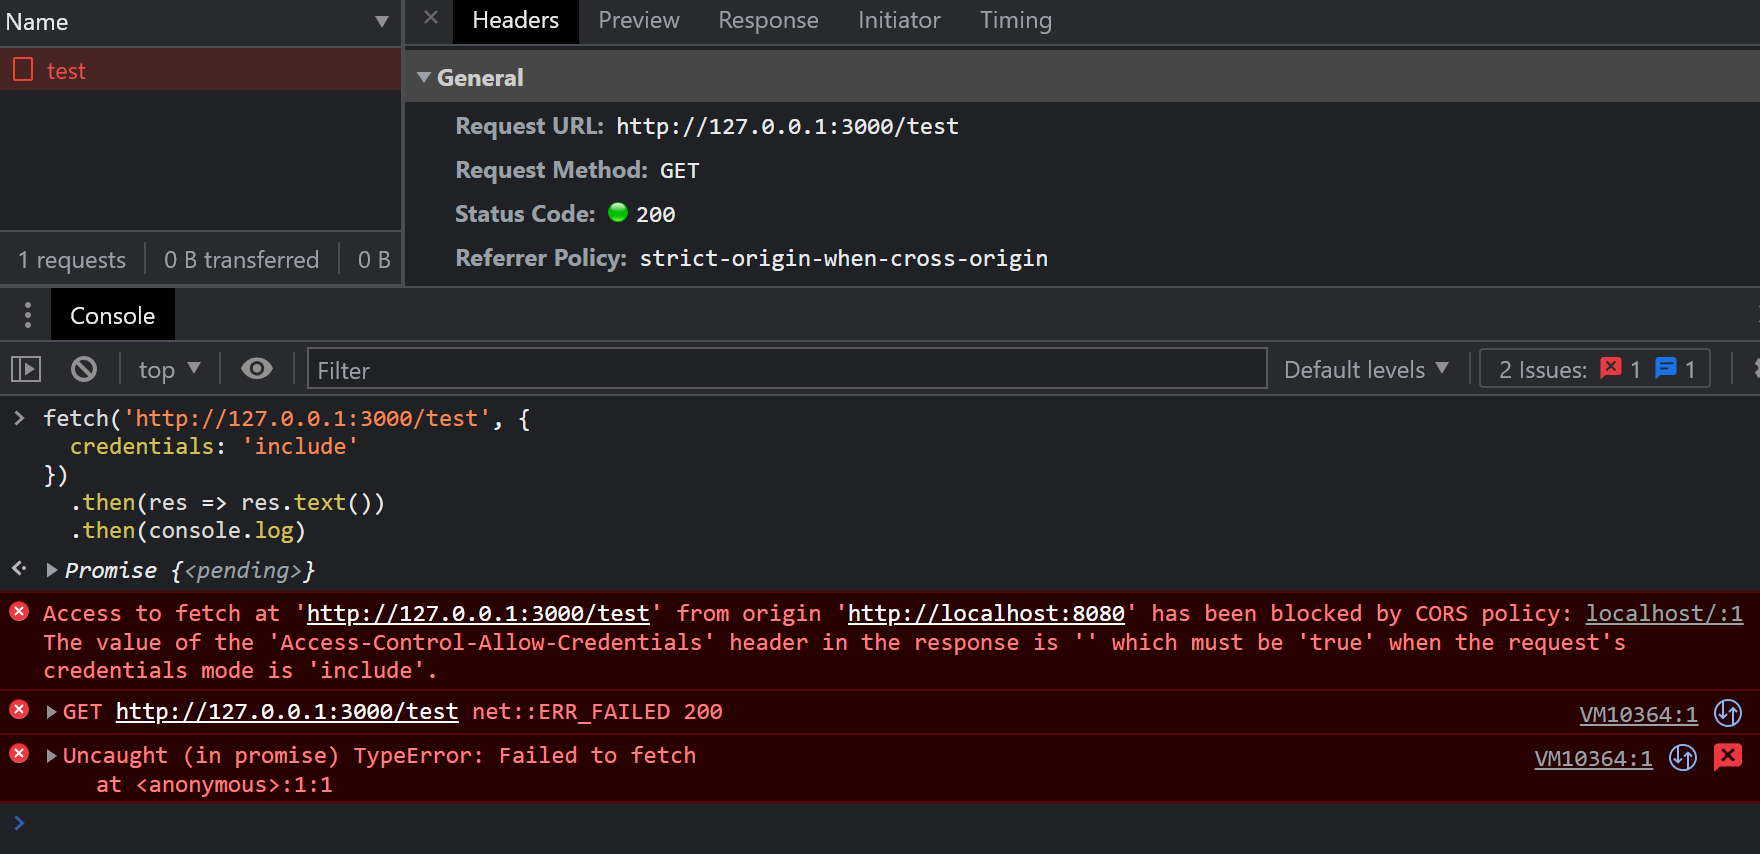
可以看到一个新的错误信息:
Access to fetch at 'http://127.0.0.1:3000/test' from origin 'http://localhost:8080' has been blocked by CORS policy: The value of the 'Access-Control-Allow-Credentials' header in the response is '' which must be 'true' when the request's credentials mode is 'include'.从错误中,我们知道,此时响应头还需要设置 Access-Control-Allow-Credentials ,将其值设置为 true(唯一合法值)。
如果不设置,对于 GET 这种简单的请求,浏览器会直接忽视响应体,而 PUT 等需要预检的请求,则预检的结果会阻止 PUT 的发送。
我们改造中间件继续测试:
app.use((req, res, next) => { res.header('Access-Control-Allow-Origin', 'http://localhost:8080') res.header('Access-Control-Allow-Methods', 'PUT') res.header('Access-Control-Allow-Headers', 'x-requested-with') res.header('Access-Control-Expose-Headers', 'test-header') res.header('Access-Control-Allow-Credentials', 'true') next()})再次请求后,问题就有解决了:
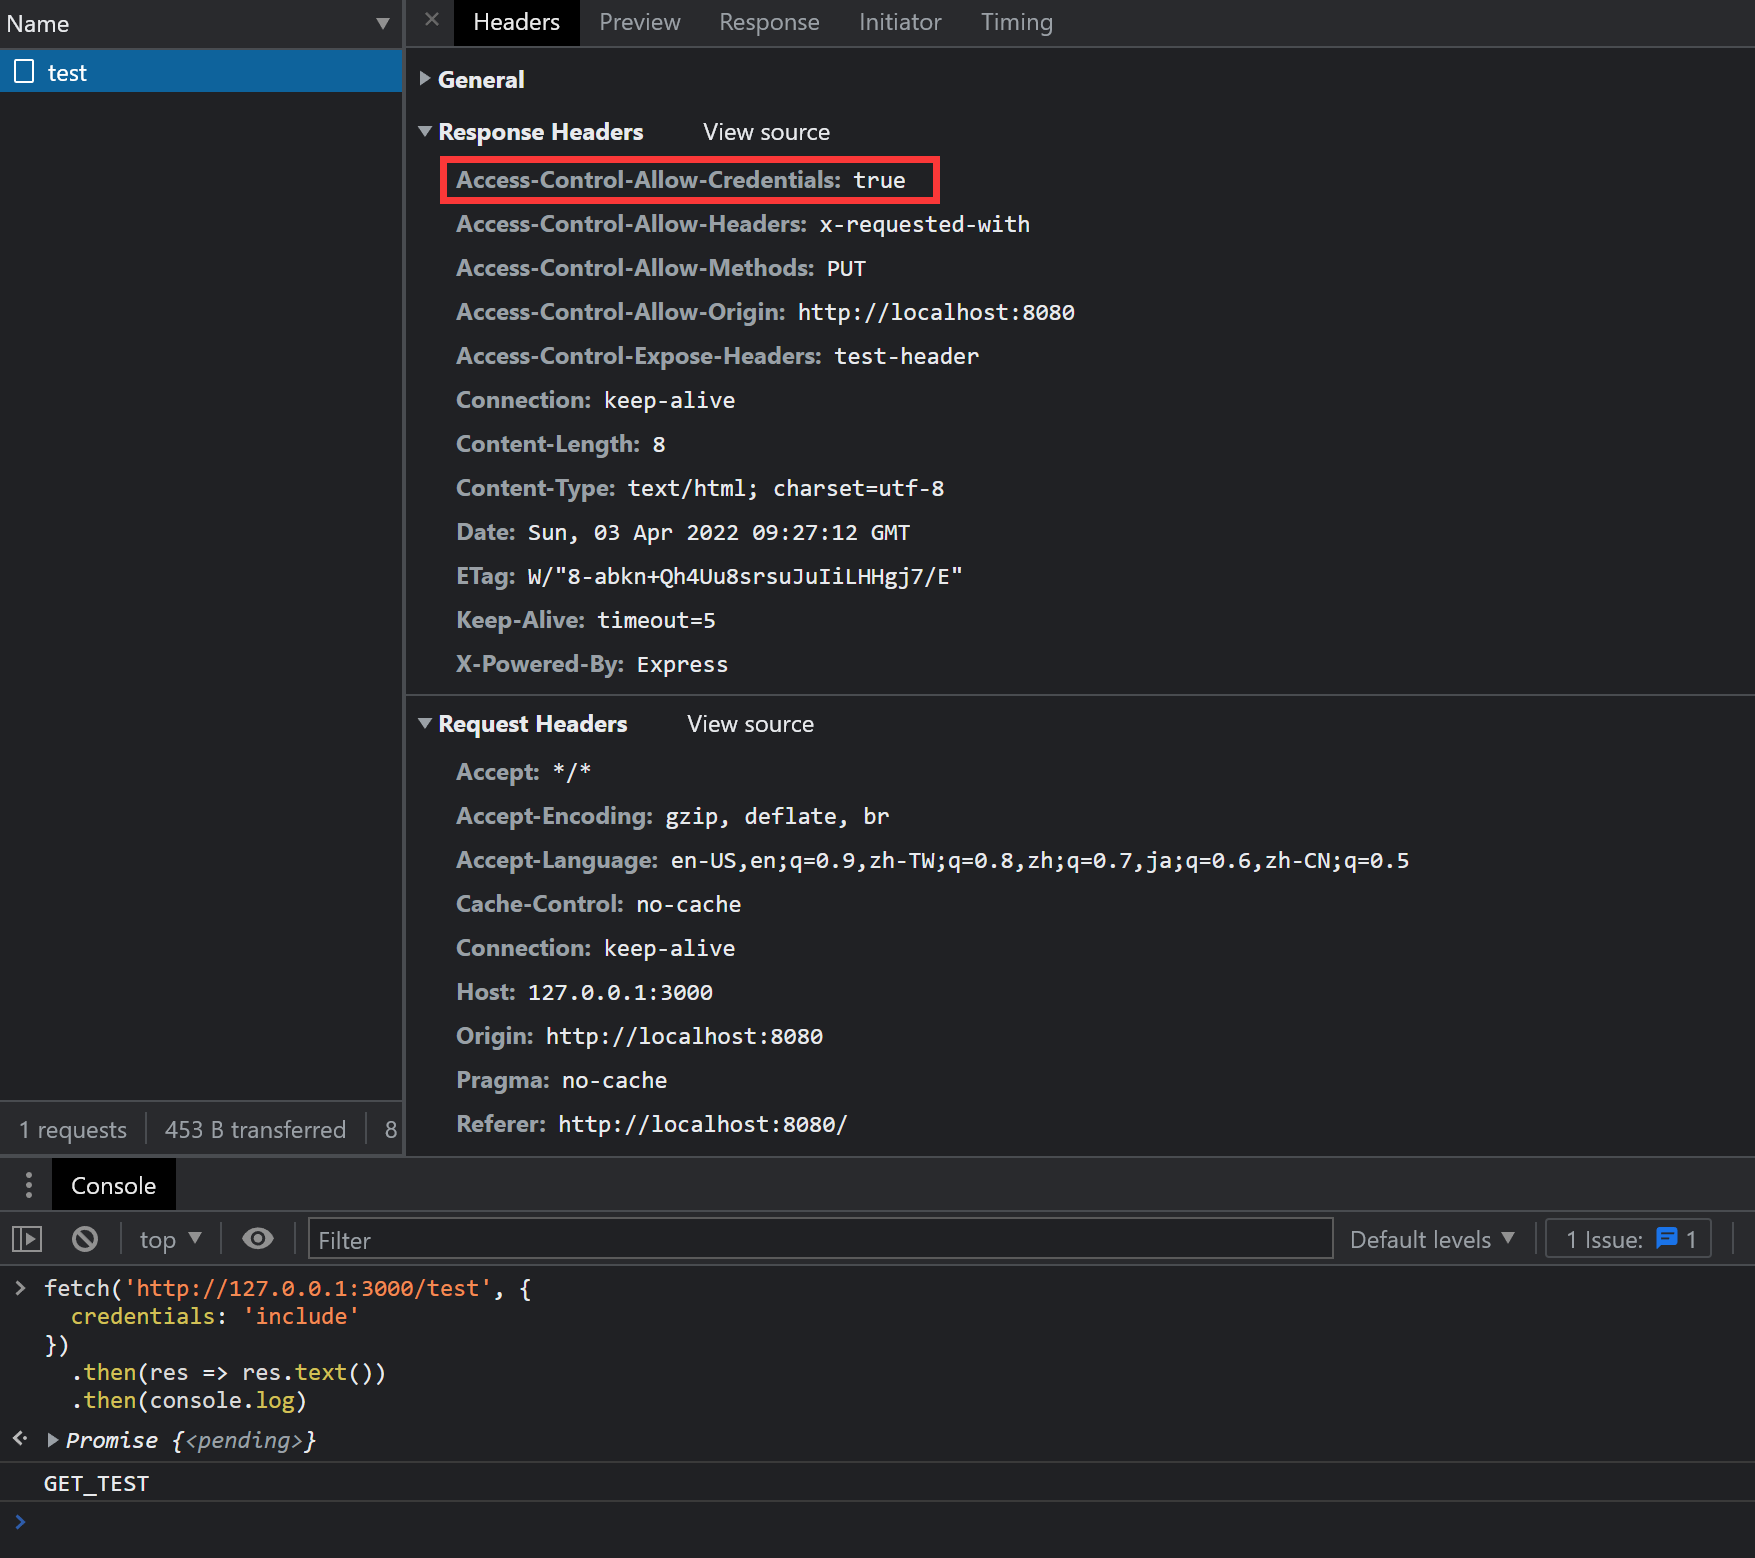
正确打印信息。
预检缓存
Access-Control-Max-Age 这个 header 用来控制预检的缓存,对于同样的请求,每次都发起一个 OPTIONS 请求并无必要,所以,可以通过这个 header 来控制 OPTIONS 预检请求的频率。
参考资料
全文完